How to Replace a Luxury Exterior Door Handle
03/25/2019, 8:04 PM

People sometimes forget about the importance of their exterior door. It is an important security concern. It adds curb appeal. And, perhaps most importantly, it gives a person their first impression of your home when they come to visit.
However, increasingly, people are starting to invest in their exterior doors. According to a study from Window and Door Manufacturers Association (WDMA), there was a 5.3% growth in new entry door shipments in 2013, totaling 14.1 million units. Of those doors, 35% were used in pre-existing constructions as either replacements or remodels.
But what if you are satisfied with your door but still want a way to upgrade the entrance to your home?
A modern front door handle replacement is a simple upgrade capable of making a significant impact.
So that’s why we’ve put together this guide on contemporary entry door handles and luxury entry door handle replacement projects. With the right hardware, a little bit of know-how and just a dash of elbow grease, you can radically transform your entry way. This all-encompassing breakdown will provide you with everything you need to know before starting your door handle upgrade project.
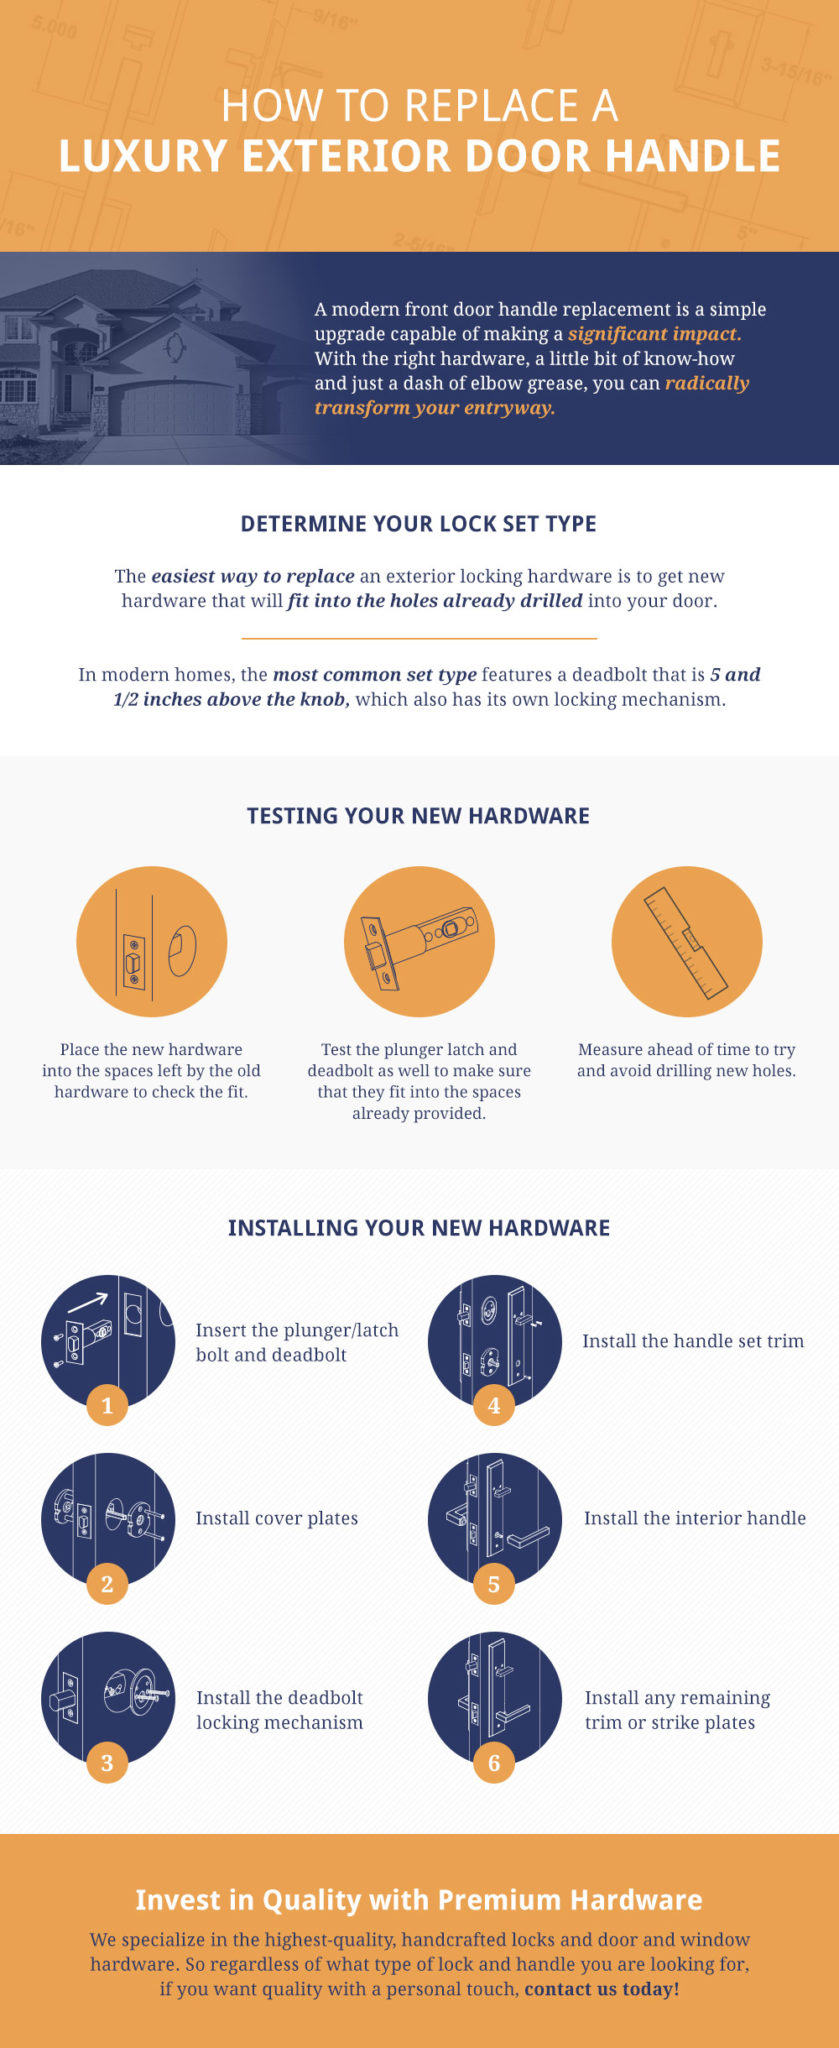
Determine Your Lock Set Type
Before you go out and buy a replacement, you need to figure out what kind of lock and handle set type you already have installed. The easiest way to replace an exterior locking hardware is to get new hardware that will fit into the holes already drilled into your door.
In modern homes, the most common set type features a deadbolt that is 5 and 1/2 inches above the knob, which also has its own locking mechanism. The newer your home, the more likely that it will feature this style of lock set, as contractors want to be able to buy exterior doors in bulk while also offering a wide range of door handle options to their customers.
However, four other less common lock set arrangements are still seen every once in a while. Some older lock brands placed the two bore holes — one for the deadbolt and one for the knob — much more closely together. A common older version has the bore holes 2 and 7/8 inches apart. They were close together because the front plate of the hardware connected both the deadbolt and the exterior handle into a single unit. A variation on this arrangement is the two point lock, in which a single hardware handle and close deadbolt require two bore holes along with a second deadbolt above the unit.
Older mortise locks have a much larger unit contained within the door, rather than bore holes. These are particularly hard to replace with non-mortise hardware. If you do have a mortise lock, your best bet is replacing it with another mortise lock. However, the rest of this guide will focus on non-mortise style hardware.
Finally, if you have a door handle that wasn’t installed professionally, the spacing between the deadbolt and the handle may be non-standard. However, if that is the case, you may still be able to use standard separate units as the diameter of the bore holes will likely still be standard.
Remove the Old Lock Set
While removing your old lock set isn’t terribly difficult, it does need to be done completely. Because lock sets are designed to be durable and make your home secure, they are installed more thoroughly and securely than other hardware throughout your home, such as interior door handles or cabinet nobs. In other words, it takes more than unscrewing a few screws.
Follow these steps to ensure that you remove your old lock set completely while avoiding damage to your door.
-
Open your exterior door:
This may seem self-explanatory, but a lot of people start the process with the door closed, often because the weather outside is either very hot or cold. However, because of how integrated your lock set is, you will need to move between the front, back and inside of your door to be sure that you have removed the components completely.
-
Remove all visible screws:
Next, you want to remove all visible screws. Although you do not need a drill with a screwdriver bit, this will make the process faster. You will find that there are quite a few screws used in a lock set. Depending on the style of the old lock set, you may also have to pry out indentations with a screwdriver. Some older lock sets have portions that are hammered into the door, rather than screwed. Do this carefully as you want to minimize damage to the door that will need to be fixed later.
-
Pull the exterior and interior handles apart:
Now that you’ve removed the screws attaching the lockset to the door, you want to pull the exterior and interior handles apart gently. If you have removed all the screws properly, the lockset should be easily removed. If you are having trouble, it is likely that you have failed to remove a screw, so inspect to make sure that there isn’t a fastener that you’ve missed rather than using force. Forcing the lock set apart will likely cause damage to your door.
-
Remove the deadbolt and plunger:
Next, remove the deadbolt and handle plunger (latch) from the side of your door. If you have removed all visible screws already, they should easily slide out. However, depending on your lock set type, they may still be attached, so remove any screws that may remain.
-
Remove the strike plates:
Finally, remove the strike plates surrounding the deadbolt and handle plunger holes from the jamb of the door. If your new hardware fits cleanly into the spaces left by your old hardware, you may not need to replace your strike plates. However, as new hardware typically comes with new strike plates, many people choose to replace them anyway, so that the finishes of the entire locking system match.
Testing Your New Hardware
Hopefully, you have measured your old lock set already to ensure that your new hardware will fit with the pre-existing bore holes in your door. However, even if you have, you want to test the fit before starting to install individual components.
Place the new hardware into the spaces left by the old hardware to check the fit. It is unlikely that the new hardware will perfectly cover every mark left by the old hardware, but don’t worry, that will be fixed later. However, if your bore holes don’t fit properly, that is a larger problem that will require drilling new holes.
Test the plunger latch and deadbolt as well to make sure that they fit into the spaces already provided.
Again, it is important to measure ahead of time to try and avoid drilling new holes. Extraneous holes and poorly fitting hardware not only makes your handle feel unprofessional, but it is also a security issue.
That being said, if you do need to make the holes larger, that is a relatively easy fix as long as you have the proper hole boring bits and a drill.
If there is significant cosmetic damage to the door that can be seen even after placing the new hardware, you have a couple of options for addressing it. Some people like fixing the damage before installing the hardware, thus avoiding accidentally painting, scratching or otherwise damaging the new hardware during the repair process. However, if you are filling or puttying parts of the door or adding some paint, you will have to wait for it to dry before proceeding with the rest of the installation. Because you are installing one of the primary security features for your home, you may not want to wait around without a lock on your front door. If that’s the case, you can fix cosmetic blemishes after installing the hardware. Just be careful to use painters tape while taking other precautions to make sure you don’t damage the new handle.
Installing Your New Hardware
Now that you know that everything fits properly, it’s time to install your new hardware. As you are installing, be sure to use the new screws that come with your hardware, rather than trying to reuse old screws. Again, because the lockset is a security device, you want to make sure that all pieces fit well.
-
Insert the plunger/latch bolt and deadbolt:
Start by inserting the latch plunger into the edge of the door. You want to make sure that the slope of the latch if facing in the direction that the door closes.
Next, insert the deadbolt into the proper hole. Secure both the latch and the deadbolt using the provided screws.
-
Install cover plates:
Once the latch and deadbolt are in place, install the cover plates to the side of your door.
Depending on your hardware, these plates may not fit perfectly in the space left by the old hardware. If the cover plates are smaller, it’s ok if a small gap remains. You can attempt to putty the area that is uncovered, but it is only a cosmetic issue, so it’s up to you.
If the new cover plates are larger, then you will need to gently use a hammer and chisel to make the space larger. Trace the new plate using a pen onto the side of the door and then carve out the extra space that you need. It doesn’t need to be perfect, but you want to make sure that the cover plate fits snuggly against the side of your door.
-
Install the deadbolt locking mechanism:
Now that the deadbolt is in place, you can fit the deadbolt locking mechanism into its proper hole. Place the keyhole side on the exterior of the door and the thumb turn side on the interior. After fitting them together, use the provided screws to secure them. Make sure that you tighten the screws completely so that they don’t loosen over time.
Once tightened, test the deadbolt to make sure that it moves freely through the door and that both the key hole and the thumb turn move properly.
-
Install the handle set trim:
The specifics of how you install the handle set trim will depend on the design of the handle set you have chosen. However, for most sets, you need to install the trim before installing the handle or lever. However, if you are opting instead for a basic door knob, there may not be any handle set trim, in which case you will install the knob much as you did the deadbolt.
Fit the trim plate into place, making sure to match the attachments on both the front and back of the door.
If this is a handle set with a rigid exterior handle and a thumb lever, the handle and lever will be attached to the handle set trim.
Some handle sets will come with paper templates to help you make sure you have all of the pieces in the right place. However, even if you don’t have a template, you can line up both sides of the hardware and test them before installing them.
-
Install the interior handle:
The interior handle will line up with an internal spindle connecting it to the level on the exterior of the door. You need to line these up. Depending on the handle style, the handle will next need to be tightened either with a set screw or with an Allen wrench. Again, make sure to tighten all screws and pieces completely to ensure that they don’t become loose later on.
As you did with the deadbolt, test the key fit and movements of the hardware to ensure that everything is working as intended. If something seems to be sticking, this is an indication that installation was not done properly, so you will need to go back and inspect your work to make sure you didn’t make a mistake.
-
Install any remaining trim or strike plates:
Depending on the style of your hardware, you may have some additional trim to install. You also will need to install the new strike plates on your door jamb. Once you have done this, test the entire door locking mechanism to make sure that all bolts are fitting into their proper places. Remember, a deadbolt is only as secure as its fit into your door jamb, so make sure that when closed, you can turn the key entirely, indicating that the deadbolt is extending fully when locked.
Invest in Quality
Now that you know how to install a new exterior door locking mechanism, it is worth noting that there is a world of difference between a budget deadbolt and high-quality hardware. Quality craftsmanship ensures that your locking hardware will last, function smoothly and keep you secure in your home.
Here at Premium Hardware, we specialize in the highest-quality, handcrafted locks and door and window hardware. Increasingly, homeowners are turning to their door and window hardware to upgrade both their appearance and their security.
So regardless of what type of lock and handle you are looking for, if you want quality with a personal touch, contact us today!