How to Replace an Exterior Door Knob or Handle
06/28/2023, 2:06 PM

You use your door handles daily — they make your life convenient and can also add to your home aesthetics. Imagine your doors without handles and how challenging it can be to push them open or hold them closed. Your door handles can become worn over time, requiring you to change them. Replacing your exterior door knobs or handles offers an excellent opportunity to upgrade to hardware with elite functionality and sophisticated finishes. Many luxurious door handles are sturdy and elegant and make beautiful additions to your home.
You can replace your front door and lock with modern hardware pieces and mechanisms that match your needs and home appearance. While finding a new door handle can be fun, changing one can be challenging. Fortunately, with simple step-by-step instructions, changing your door handles can be an easy experience.
How to Replace a Door Handle
Replacing a door handle with a lock can be a tricky process at first. With some guidance, you’ll see that it can be an easy and quick task. Note that not all handles are installed as below — read your handle or knob’s installation instructions and follow them. With that in mind, here are general instructions on how to replace your door handles:
1. Remove the Existing Handle
Secure your door with a door stopper or any other wedge-shaped object that can help keep your door steady while removing your handle. Look for a slot on the side of the door handle that connects to the cover, then follow these steps:
- Remove the lever: Some handles have a hole that requires using a pin to push out the handle. Others have a slot, where you can insert the tip of a flathead screwdriver and apply some force to pull off the handle. Other handle types have a set screw and will require an Allen key to remove the lever.
- Remove the cover plate: If your cover plate has screws, remove the screws using a flathead screwdriver. Then, look for a slot on the bottom or side of your plate. Place your screwdriver in the slot to pull the cover off. Some round cover plates screw on. If you have a round cover plate without screws or slots, try unscrewing it.
- Remove the latch plate: After removing your cover plate, remove the screws holding the latch in place. The latch is a metal-edged piece on the inside edge that moves in and out when you open or close your door. Remove the inner plate screws too. The inner plates sit under the cover plate. Pull the metal latch plate and mechanism from the door’s inside edge and the plate from either side of the door and put them aside. You can now see all the holes in your door where you will insert the new handle.
2. Install the Latch
Latches are sold in either 2 3/8-inch or 2 3/4-inch backsets. You’ll want to ensure the new latch matches the old latch. Some latches are adjustable between 2 3/8-inches or 2 3/4-inches. Latches are also available with square and radius corner faceplates and drive-through latches without a faceplate.
Install the new latch plate into the borehole on the inside edge of the door. Slide the latch mechanism into the hole and ensure the angled piece faces the same direction as the door closes. Secure the latch place with two short screws so it sits flush against the inside edge of the door. If your latch does not fit perfectly, use a chisel to adjust the width and shape of the cavity where the latch slides in.
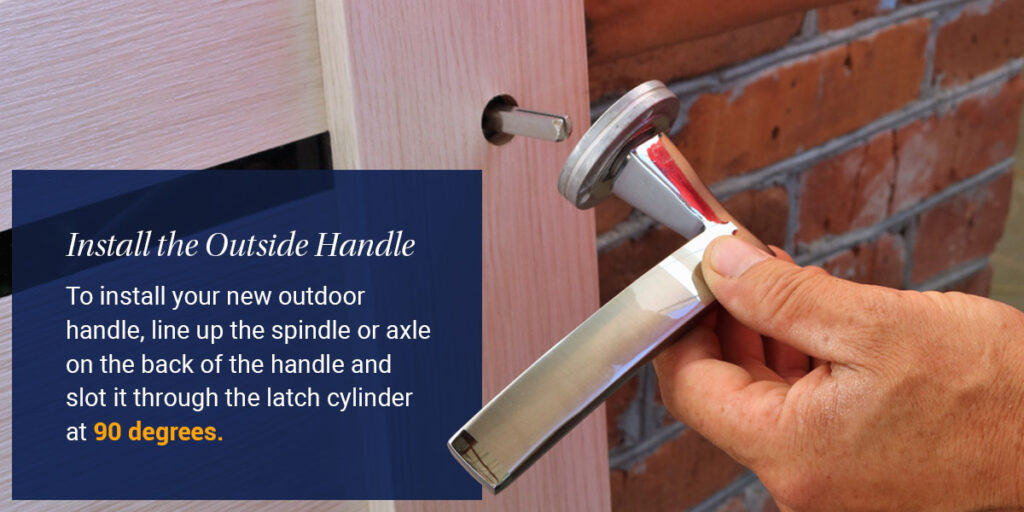
3. Install the Outside Handle
To install your new outdoor handle, line up the spindle or axle on the back of the handle and slot it through the latch cylinder at 90 degrees. Some outdoor handles may attach just below the borehole and require some adjustment before installing your outdoor handle. You can drill another hole under the lower borehole.
Ensure the handle’s spindle lines up with the slot in the latch. Place the spindle through the latch cylinder, maneuvering any mechanisms up or down to fit your outside handle.
4. Install the Inside Handle
Replace your old door handle or knob with the same size and shape as your previous one to cover up any holes. Take your new handle and align it with the outdoor handle. Your handle lever should face away from the door jamb or the door’s side post. Secure your handle, pulling the interior and exterior pieces together. Your handles should feel firm after joining them. Screw the handles and inner plates to the door using the provided screws.
Replace your old door handle or knob with the same size and shape as your previous one to cover up any holes. Take your new handle and align it with the outdoor handle. Your handle lever should face away from the door jamb or the door’s side post. Secure your handle, pulling the interior and exterior pieces together. Your handles should feel firm after joining them. Screw the handles and inner plates to the door using the provided screws.
5. Install the Deadbolt
Install your new deadbolt to finish the look of your new door handles. Insert the deadbolt into the upper borehole or hole above the handle. Ensure the deadbolt fits securely and is facing up. Your deadbolt may have an arrow indicating the direction.
If you have a faceplate, screw it in and ensure it is secure. You can install the deadbolt mechanisms inside and outside your door. Ensure you install the keyed cylinder part on the outside of the door. Your deadbolt should be secure in the door. The inside thumb or metallic element should move toward the door jamb when locking your door.
6. Install the Strike Plates
Align one strike plate on the door jamb with your deadbolt and the other with the latch, installing one at a time. The bent lip of your strike plate should face the door’s opening. Once the plate aligns with the latch or the deadbolt, drill two holes if needed, one on top and one at the bottom, where you will attach your strike plate.
Attach your strike plate to the door jamb and secure it with two longer screws. Do not completely drill in one screw before the other. Instead, alternate between drilling in your top and bottom screws to keep your strike plate in alignment.
You should test your latch and deadbolt and ensure they slide smoothly in and out of your strike plate. Adjust your deadbolt if it slides into your strike plate too loosely or does not turn in. You can drill the bolt hole in deeper until it turns in or adjust your strike plate as needed.
Install Your High-Quality Door Handle From Premium Hardware
Enhance your door functionality and home appearance with high-quality and elegant door handles and knobs. At Premium Hardware, our team of experts is highly skilled at recommending secure, durable and sophisticated products. We specialize in various pieces of door hardware and can help you find unique door handles to complement and enhance your home aesthetic.
Contact us today to learn more about our hardware products or shop our residential door hardware.